
How do I wind the bobbin on my Icon Machine?Updated 3 months ago
Your Icon machine features two ways to wind your bobbins to add to your sewing enjoyment!
Standard Bobbin Winding
All types of thread, including, specialty threads such as invisible or stretchy threads, metallic or flat metallic threads, should be wound directly from the auxiliary spool pin without passing the needle or presser foot.
Note: Always wind specialty threads at a lower speed.
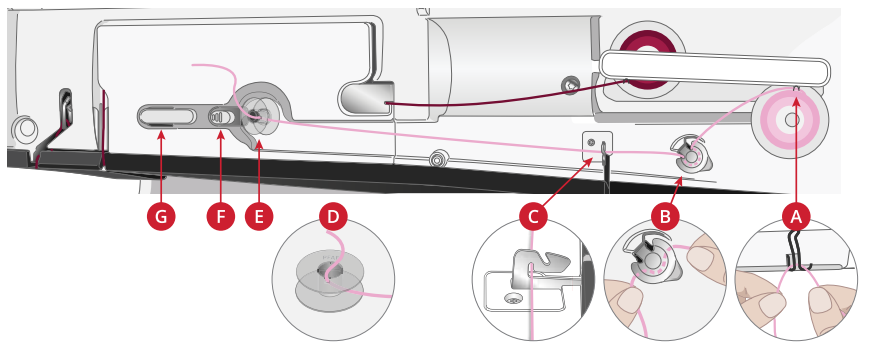 1. Place a thread spool on the auxiliary spool pin. Using both hands, pull the thread behind the right clip on the telescopic thread guide (A). The thread should run from right to left.
2. Bring the thread through the bobbin winding thread tension guide (B) from the back to the front and to the left.
Bring the thread through the bobbin winding thread guide (C) as illustrated.
For some specialty threads, following the normal threading path will result in a bobbin that is wound too tight. If this happens, bypass thread tension disc (B) to reduce the amount of tension on the thread. Pull the thread from thread guide (A) directly to the bobbin instead.
3. Thread through the slot in the bobbin (D) from the inside to the outside. Place the bobbin on the bobbin spindle (E). The bobbin only fits on one way, with the logo facing out.
The bobbins included are designed especially for your Creative Icon 2 machine.
4. Push the bobbin winder lever (F) towards the bobbin. A pop-up appears on screen. To adjust the winding speed, drag the slider. Hold the thread end firmly when starting to wind. Touch the play button in the pop-up window and let the thread wind a few turns. Touch the pause icon and cut the loose thread end close to the bobbin. Press play again.
5. When the bobbin is full, the bobbin winding lever will move back, and the winding will stop automatically. The pop-up message closes. Remove the bobbin and cut the thread using the bobbin winding thread cutter (G).
Winding through the Needle
When using the same thread in the needle and bobbin, it is convenient to wind a new bobbin directly through the needle without having to unthread/re-thread your machine.
We do not recommend winding specialty threads such as invisible or other stretchy threads, metallic or flat metallic threads through the needle. Very heavy and coarse threads should not be wound through the needle either as the thread tension can become too high, causing the needle to break.
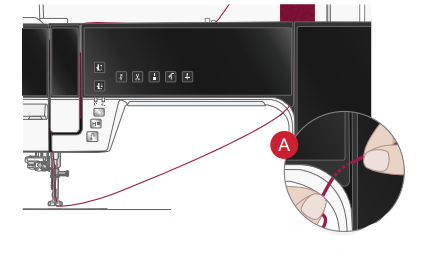
1. Make sure that the presser foot and needle are in the up position.
2. Thread the machine as described under Threading the Upper Thread.
3. Pull the thread from the needle, under the presser foot and up to the right.
Note: Always use a metal presser foot when bobbin winding from the needle
4. Bring the thread from right to left into the bobbin winding thread guide (A), and from left to right through thread guide (B).
5. Thread through the slot in the bobbin (C) from the inside to the outside. Place the bobbin on the bobbin spindle. The bobbin only fits on one way, with the logo facing out.
The bobbins included are designed especially for your Creative Icon 2 machine.
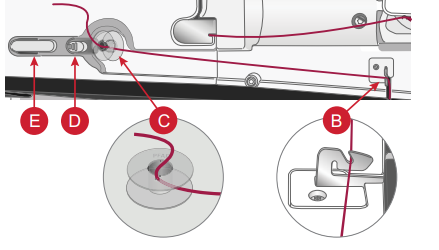 6. Push the bobbin winder lever (F) towards the bobbin. A pop-up appears on screen. To adjust the winding speed, drag the slider. Hold the thread end firmly when starting to wind. Touch the play button in the pop-up window and let the thread wind a few turns. Touch the pause icon and cut the loose thread end close to the bobbin. Press play again.
Note: Always use a metal presser foot when bobbin winding from the needle.
7. When the bobbin is full, the bobbin winding lever will move back, and the winding will stop automatically. The pop-up message closes. Remove the bobbin and cut the thread using the bobbin winding thread cutter (G).
Note: If you experience difficulty winding a bobbin through the needle and you are using a large thread cone, move the cone to the auxiliary spool pin and use the right clip on the telescopic thread guide instead. Place the large spool holder with the flat side up and a cone holder on the auxiliary spool pin before adding the thread cone